Version 6.4 (All Platforms)
NAT32 is a software package which lets all computers on your private LAN share a single connection to the Internet. You can then run most standard networking applications on any computer on your LAN, without any reconfiguration of those applications.
NAT32 works with Windows Dial-Up Networking (using either standard modems or ISDN adapters), Cable Modems and Ethernet Adapters connected to a LAN which has an Internet Gateway.
This Installation Manual describes how to install, configure and operate NAT32 to share a Dial-Up Networking Connection or a Cable Modem Interface. If you follow these instructions carefully, you'll have NAT32 up and running in just a few minutes.
Cable Modem and xDSL users should read
Appendix 1 before continuing. It describes two different methods for connecting
your Private LAN to the Internet.
NAT32 will run on any PC running Windows 95, 98 or NT 4.0. About 1.4 MBytes of disk space is required and 8 Mbytes or more of system RAM is recommended. NAT32 is distributed as a single package for both Dial-Up Networking and Cable Modem users. The Microsoft rasapi32.dll must be available on your computer if you plan to use Dial-Up Networking.
The needed DLL will be available if the following options have been installed on your computer:
![]() NAT32 Builds 1085 and later
contain a DHCP daemon. If you don't know what this is, please follow the
instructions below. If you do know what DHCP is, then configure your private
machines (but not the machine running NAT32) to "Assign an IP address automatically".
NAT32 Builds 1085 and later
contain a DHCP daemon. If you don't know what this is, please follow the
instructions below. If you do know what DHCP is, then configure your private
machines (but not the machine running NAT32) to "Assign an IP address automatically".
Please make sure that you are using private IP addresses on your private LAN. If you aren't, then NAT32 Auto-configuration will not work correctly.
Private IP addresses are:10.x.x.x 172.16.x.x - 172.31.x.x 192.168.x.x
To test your LAN:
From a Windows Console (sometimes affectionately called a DOS Box), run the ping program and ping all machines connected to your LAN. If any machines can't be reached, check the configuration of the TCP/IP protocol stack on all machines.
To test your Dial-Up Networking Connection:
Start a connection and then ping any desired host on the Internet. If you get no response, your Dial-Up Networking configuration is incorrect and you should fix it before continuing.
To test your Cable Modem Connection:
Ping any desired host on the Internet. If you get no response, your Networking configuration is incorrect and you should fix it before continuing.
Please consult a local expert if you have any difficulties getting your standard Windows TCP/IP Networking to work correctly.
DO
NOT attempt to install NAT32 on a non-functional LAN.
All versions of NAT32 use a custom device driver to interface to Windows Network Adapters. This driver is installed as a Protocol using the Control Panel Networking Applet. Note that you require Administrator privilege to install Device Drivers on Windows NT.
Should you ever decide to remove NAT32 from your system, simply delete your NAT32 directory and then use the Control Panel to remove the NDIS3PKT Device Driver from your system.
IMPORTANT NOTE FOR 95/98 USERS UPGRADING FROM PREVIOUS VERSIONS OF NAT32
Before installing the latest version of the device driver, please do the following:
Start NAT32 by typing the following commands into a Windows Console:
The above commands mean: change to the \nat32 directory and then run the program nat32.exe.
NAT32 will start and display the following dialog box:
If you already have a RegNet License Number, please Paste it into the dialog box using Ctrl-C to copy it from your E-mail program and Ctrl-V to transfer it into the above dialog box. Also type in the 6-digit RegNet Order Number (Transaction Number) which was shown in the RegNet order confirmation E-mail.
Otherwise, simply click Continue... and the NAT32 Options dialog box will appear:
·
To use Dial-Up Networking, select Client.
·
If you would like NAT32 to dial a particular connection each time it starts,
select a connection from the drop-down list.
·
To use the Dial-Up Networking Server, select Server and One.
For full details on how to configure the DUN Server, please see Appendix
2.
·
To use NAT32 with your Cable Modem Interface, select None in the
Dial-Up
Networking Group and Two in the LAN Interfaces Group.
NOTE: Even if you only have a single Ethernet Adapter in your computer, always select two NAT32 LAN Interfaces when sharing your Cable Modem. Appendix 1 explains Cable Modem support options in detail.
·
If you click the Create a Desktop Shortcut checkbox, NAT32 will
create a Shortcut on your Desktop, allowing you to easily restart NAT32
with the selected options in the future.
·
Clicking Help displays an informative Help dialog.
Now click Continue... to start the NAT32 Console.
The NAT32 Console is a window running a powerful, UNIX-style, command-line shell, supporting concurrent execution of a rich command set, redirection of I/O devices and command pipelines. In addition, the Console contains a Menu Bar for starting frequently used commands per mouse-click, and a Status Bar for displaying Menu Tips and useful configuration information.
The NAT32 Console will initially be similar to the following:
Note that NAT32 has detected that the required device driver was installed correctly, that a Dial-Up Networking Adapter is available and that a Windows Network Interface Controller (NIC) is available.
If any errors are shown, you probably
forgot to reboot Windows after installing the NAT32 Device Driver. Please
reboot Windows and check that the NDIS3PKT Driver is present in the Control
Panel Networking Applet.
The NAT32 package contains an enhanced IP Router, which acts as a Gateway to the Internet for all the other PCs on your Private LAN.
· All the other PCs on your private LAN must be configured to use NAT32 as their gateway to the Internet. The IP address to specify as that gateway is shown in the bottom-right corner of the Status Bar in the NAT32 Console.
· All the other PCs on your private LAN must also have DNS enabled. Specify the address of NAT32 as the DNS server. NAT32 will then forward all DNS requests to the real DNS server which it determines at run time.
· Those other PCs on your private LAN must also have a Domain specified. Use the same Domain your ISP uses.
· To simplify the configuration of those other PCs, you might like to use DHCP. More details on this are here.
· NAT32 forwards traffic from the private machines to the Internet via the Windows Dial-Up Networking Adapter or the Cable Modem Adapter, after performing appropriate Address Translations and Port Mappings.
· Traffic coming in from the Internet is forwarded to the correct PC on your private LAN.
· The computer running NAT32 retains totally unmodified Internet access, which means that all networking applications running on that computer behave exactly as before.
In order to perform its tasks, NAT32 uses several Logical Network Interfaces, which are configured using a dialog similar to the following:
All of the values you see in the above dialog box have been carefully extracted from the Registry and will be correct for most configurations. If any fields (except the two checkboxes) are blank, please consult the explanation of the fields by clicking Help. Most users will be able to use the supplied values and can continue by clicking OK. This will cause the values to be saved in the file: nat32\netcfg2
The NAT32 IP address deserves special mention. This value was determined by replacing the last part of the private IP address that you are using on your LAN with the value 100. If you have already assigned this address to some other machine on your private LAN, please specify some other appropriate value in the NAT32 IPaddr field.
The Name Server field should contain the IP address of a valid DNS Name Server or the string auto, in which case the current Windows DNS address will be used. Although NAT32 does not normally need a Name Server, it does support a DNS Mapping feature which can be used by your other PCs for DNS Name Resolution. To use this feature, simply configure the other PCs to use NAT32's IP address as their Domain Name Server.
When you are satisfied that all values are correct, please click OK to continue. The NAT32 Console should then appear similar to the following:
In the above example, NAT32 was started after the Dial-Up Networking Connection OzEmail had been established from within Windows. The example illustrates how NAT32 "hooks into" the existing Windows DUN Connection and then uses that connection to give all computers on your private LAN (172.16.0.0) Internet access via the registered (or official) IP address 203.108.57.248.
NAT32 can also be started before a DUN Connection has been established. In this case, a specified connection will be dialled automatically as soon as any IP packet needs to be forwarded to the Internet.
Note that NAT32 does not shutdown an established DUN connection when it exits.
NAT32 is now ready for use. You can shrink or hide the NAT32 Console by clicking the X button in the Console Window.
To confirm the correct operation of NAT32, please ping the machines on your private LAN from the NAT32 Console. You should also be able to ping any Internet Host from the NAT32 Console.
If any ping tests fail,
please consult the Troubleshooting
Tips Section below.
Once you have NAT32 working to your satisfaction, you should click on the NAT32 Help Menu and select the How to Register item. This will display a WEB Page with current registration information, including price, methods of payment and other details. The page also contains a link to a Web Site through which you can register NAT32 on-line in real-time.
I thank you for
evaluating the NAT32 package. Please visit the NAT32
Home Page for the latest upgrades
to this product.
An extensive
set of Help Pages are available here.
You can download a zip file containing those pages by clicking here.
If the Windows Dial-Up Networking Connection disconnects for any reason, simply click Reconnect in the Windows pop-up Dialog Box.
When the new connection is established, NAT32 will automatically begin using the new connection.
NAT32's extensive command set allows you to interrogate the system and perform useful operations. All of the commands you will need are documented in UNIX-style HTML Help Pages, which you can view by typing help command at the NAT32 command prompt.
The file nat32.doc
contains further technical information for advanced users.
Windows TCP/IP problems:
·
Be sure you have configured the TCP/IP stacks on all machines
(other than the machine running NAT32) to use the NAT32 IP address as the
gateway (172.16.2.100 in the sample configuration).
·
Be sure you have enabled DNS and specified a valid Domain and Domain
Name Server on all machines.
·
Perform all of the ping tests described in the section: Before
Installing NAT32
·
If any tests fail, please contact a local expert for help on installing
Microsoft TCP/IP and Microsoft Dial-Up Networking.
NAT32 configuration problems:
If you made an error during the configuration
run, terminate NAT32 by typing exit at the NAT32 command prompt.
Then run the file \nat32\clean.bat from a Windows Command Box. This
will erase all NAT32 network configuration files and you can then start
a new configuration run.
If you can't get NAT32 to work, please click the Help/info.txt menu item in the NAT32 Console and then include file info.txt in an e-mail to: support@nat32.com. The info (or ntinfo ) command executes a sequence of NAT32 diagnostic commands. The output of those commands will be written to file info.txt in your NAT32 directory. Note that several seconds are required for the diagnostic information to be gathered and written to info.txt.
The NAT32 Web Page faq.html contains a list of Frequently Asked Questions. It also has a link to an Interactive Message Board much like a Newsgroup) to which you can post technical questions and read the answers to other user's questions.
Please note that the Windows 95 CD-ROM contains an excellent Networking Section in the Resource Kit Help File located in \Admin\Reskit\Helpfile\Win95rk.hlp. Please consult this file for full details on all aspects of both Windows Networking (used for File and Printer Sharing) and TCP/IP Networking.
Windows NT and Windows 98 users need
to purchase the Resource Kit separately. I highly recommend it as an accurate,
definitive source of information on all aspects of Networking on the Windows
platform.
You basically have two options for
installing a Cable Modem and a private LAN segment at your site:
On the Windows 95/98 platform, a second Microsoft TCP/IP Protocol must be added to the Adapter. Unfortunately, Windows does not let you select the particular adapter to which the second TCP/IP Protocol is to be added. The Control Panel simply binds the Protocol to the first available Adapter. This is only a problem if a Dial-Up Adapter is also installed on your system, so you may need to temporarily remove the Dial-Up Adapter, install the needed second Protocol and then re-install the Dial-Up Adapter.
Option 2
You leave your Cable Modem attached to your existing Ethernet Adapter and connect your other machines to a second Ethernet Adapter.
This dual-adapter configuration gives best performance because your other machines use a separate network to communicate internally and with NAT32. This configuration is also the easiest to install and configure.
Another important advantage is that NAT32 will effectively "hide" your private LAN computers from other users on the Internet. Those machines will not be accessible to unsolicited incoming traffic, unless you intentionally make a machine accessible by using the NAT32 Permanent Port Mapping feature (see the ppmap command for details).
The Cable Modem TCP/IP Stack is configured as per instructions given by the Cable Modem Service Provider. Most Service Providers use DHCP to auto-configure the stack at boot-time. In this case, NAT32 will automatically determine the current configuration and "hook into" it each time it is run. Note that you do not need to use NAT32s built-in DHCP client in this case. That client has been provided for other purposes.
If your Service provider uses a fixed configuration, be sure it is configured as follows:
Also note that DNS settings always apply to all Adapters on your system. In other words, if you enable DNS for one Adpater, it will be used on ALL adapters.
Once you have set the above values
using the Windows Control Panel Network Applet, please reboot your
machine and test your settings by pinging your local machines. If any pings
fail, please consult a local expert on TCP/IP configuration.
NAT32 and the Windows 95/98 DUN Server
The Windows 95/98 DUN Server, in conjunction with NAT32, can be used to give one or more remote computers full TCP/IP access to the Internet via a connected Windows 95/98 computer in your office or at your place of work.
NAT32 will automatically start and stop the DUN Server at specified times on specified days, allowing your office phone to be used for normal calls during business hours. Please see cron for details.
Before configuring NAT32 for Server operation, please confirm that you have the DUN Server installed on your office computer. Clicking on the Connectionsmenu item in the Dial-Up Networking folder should show the following menu items:
If the Dial-Up Server... menu item is not shown, you should first install Microsoft DUN 1.2, available free of charge from the Microsoft. If you are running the DUN 1.3 Upgrade for Windows 95, you need to install the DUN Server separately. You do this from the Control Panel Add/Remove Programs applet.
If the Dial-Up Server... menu item is present but inactive, it could be because:
·
You don't have File Sharing installed. Use the Control Panel Network applet
to install it.
·
Your System Administrator has set NoDialin and/or NoFileSharing
in the registry. Use regedit to modify the settings.
·
In Windows 98 and Windows 95 DUN 1.3, the DUN Adapter must have
the Enable Point to Point IP option turned off in the Advanced
Properties of that Adapter.
Removing TCP/IP from the DUN Adapter
Open the Windows Control Panel and start the Network Applet. If a Microsoft TCP/IP protocol stack is bound to the Dial-Up Adapter, select it and click Delete.
Start the Dial-Up Server by clicking the Dial-Up Server menu item in the Dial-Up Networking folder. You should see a Dialog Box similar to the following:
Select the desired modem and click the Allow caller access button. Click Change Password and assign a strong password. This will ensure that no unauthorised access to your DUN Server can take place. Click No caller access and then Apply. Then move the DUN Server dialog box to the edge of your Desktop.
Because of a bug in all versions of the Windows DUN Server, you should NOT click OK at this point. Simply drag the dialog box to one side of your Desktop.
If more than one modem was shown, as in the above example, use the Control Panel Modem Applet to remove all modem types except the one that is actually to be used.
NAT32 Configuration consists of several steps:
To configure your home machine, proceed as follows:
Connecting an entire LAN to your Office Server
If your home PC is also fitted with an Ethernet Adapter, you can configure it to give ALL computers on your home LAN access to the Internet through your office machine.
After configuring the machine with the modem as described above, you now need to perform the following additional configuration steps on that machine:
HKLM\System\CurrentControlSet\Services\VxD\MSTCP
You do this as follows:
It is crucial that you have an updated vip.386 driver installed on your machine. The driver is available from Microsoft as part of the Windows DUN 1.2 (and later) upgrade. If you are running the original vip.386 driver installed from the Windows 95 CD ROM, your machine will crash on reboot, in which case, do the following:
·
Boot up in Safe Mode by pressing F8 just as Windows 95 starts booting.
·
Set EnableRouting to 0 using regedit.
·
Download the DUN 1.2 or DUN 1.3 upgrade and install it.
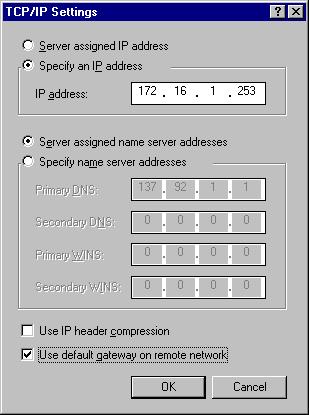
The final step is to open the Properties of the DUN connection you will be using to connect to your office machine, select Server types and then click the TCP/IP Settings... button. Clear the Use default gateway on remote network check-box.
Now reboot your machine and, while it is rebooting, go to your other machines and configure their TCP/IP protocols as follows:
IP address: 172.16.2.x
(x represents any unused address)
Subnet Mask: 255.255.255.0
GW address: 172.16.2.1
DNS Address: as
used on your office LAN
Test your setup by dialing into your office machine. Once the connection is up, open a Windows Console and enter the following commands:
route delete 0.0.0.0
route add 0.0.0.0 mask
0.0.0.0 172.16.1.253
This will add a default route to your Windows routing table. Once this route is in place, all your other private machines will also be able to access the Internet.
The Windows NT RAS Server, in conjunction with NAT32, can be used to give one or more remote computers full TCP/IP access to the Internet via a connected Windows NT computer in your office or at your place of work.
Note that NAT32 will NOT work in Server Mode with NT RRAS.
NAT32 will automatically start and stop the RAS Server at specified times on specified days, allowing your office phone to be used for normal calls during business hours.
Before configuring NAT32 for Server operation, please install the RAS Server on your office computer as follows:
· Open the Control Panel Network Applet
and click the Services tab.
· Click the Add button and then
scroll through the list until the Remote Access Service is found.
· Select that service and the click OK
to complete the installation.
Note that you require administrator privilege in order to install and configure Services on NT.
Open the Control Panel Network Applet and click the Services tab.
Click Configure to configure the selected Port. The following dialog box will appear:
Be sure the Dial out and Receive calls radio button is checked then click OK.
In the Remote Access Setup dialog,click the Network... button.
Be sure that only the TCP/IP protocol is checked in the Server Settings group. The Encryption options should be set to match those of your Dial-in Client.
Click the Configure... button for TCP/IP in the Server Settings group. The following dialog box will appear:
Be sure that the static addresses 172.16.1.253 and 172.16.1.254 are used. No other values will work. Also be sure that the Allow remote clients to request a predetermined IP address checkbox is checked.
The NAT32 command duns [on|off] can be used to start and stop the RAS SERVICE. The command automatically starts and stops rasadmin.exe as needed.
Test your setup and then register
NAT32.
The above document describes the NAT32Ò software package Version 6.4.The current version of the package can be downloaded from the NAT32 Home Page.
Copyright Notices:
(C) 1995-2000 A.C.T.
Software (support@nat32.com). All rights reserved.
(C) 1995-2000 Dan
Lanciani (ddl@danlan.com). All rights reserved.
Redistribution: This software may be freely redistributed, provided that:
By registering, both parties explicitly agree to the following TERMS and CONDITIONS:
· On receipt of the License Fee, the LICENSOR shall: